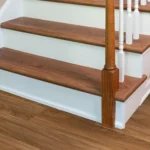
Hardwood flooring is a truly wonderful and long-term beneficial choice for nearly every residential and commercial place. Speaking of commercial settings, hardwood flooring also makes a great gym floor, both indoors and outdoors. That’s because it has an extremely sturdy structure and high impact resistance and can endure high footfall and heavyweight items.
Over and above, this flooring does the aesthetic uplifting job really well and one can design incredibly attractive gym spaces by investing in it. However, it all comes down to the dire need for a flawless installation, to achieve all the benefits and keep doing so for longer periods. And that’s exactly what PVC Vinyl Flooring is going to guide you about today!
Installing Hardwood Flooring In Gym In A Few Steps | Best Beginner’s Guide

Up ahead, is a streamlined method of fitting hardwood flooring in gym interiors (or maybe exteriors) which you can consider as the utmost gainful guideline for both DIY jobs and informative purposes.
Materials To Gather
- Hardwood Flooring (of course! Try getting darker colors as those are easy to upkeep in commercial environments)
- Moisture Barrier (it’s generally optional but fundamental in case of concrete subfloors and/or moisture-prone
- Hardwood Sports Flooring Adhesive
- Stapes/Nails (depends on what installation method you choose)
- Flooring Nailer/Stapler
- Miter Saw/Circular Saw
- Rubber Mallet
- Chalk
- Tape Measure
Steps To Follow
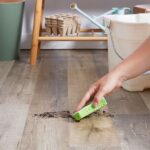
1. Preparing Subfloors:

- Make sure every inch of your subfloor is perfectly leveled, dry, and free from defects and damages.
- In case of problematic floors, you might as well, need to pour concrete, install a plywood surface or just repair the uneven parts.
2. Acclimating Hardwood:

- Leave your hardwood planks to acclimate in the same space where you intend to install them.
- Ask your Gym flooring retailer or supplier about the exact timeline of acclimation, as it can range from 24 hours to a couple of days.
3. Flooring Layout:

- Start by drawing out the layout of the installation and use the chalk to make necessary markings.
- Determine both the starting and end points and if you want to create any particular patterns with the planks, plan those as well.
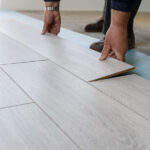
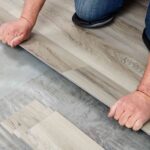
4. Installing Planks:

- Have the moisture barrier or underlayment installed first to get a smooth canvas to work on.
- Pick a straight reference line and install the first row of hardwood planks alongside, while leaving enough expansion gaps between the planks and the wall.
- Depending on the type of hardwood flooring, you can either go with the application of adhesive make use of staples/nails, or even both.
5. Cutting Planks:

- Continue the installation process with a tight fit between the floorboards.
- When you come across any obstacles or uneven parameters in the area, you’ll need to cut the boards or planks with a circular saw or miter saw for an accurate fit.
6. Finishing Fittings:
- Once you’ve secured the final row of planks, all the trims, moldings, and/or installation strips can be installed back in (if any).
7. Sanding Surfaces:

- Finish off by sanding the entire flooring thoroughly to get rid of any bumps and achieve a smooth and even surface.
- At this point, you can have the application of an appropriate sealer (according to your flooring type) and polyurethane coats for finishing.
8. Decorative Touches:
- Lastly, you can paint any commercial logos or guiding lines if required.
Essential Considerations For Flawless & Long-Term Gym Floor Treatments
Take care of these aspects to make your hardwood gym flooring appear seamless, attractive, and functional for longer periods of time, i.e. professional-like outcomes.
- Subfloor preparation is, by far, a really important step that serves as the foundation for the entire treatment and has a great impact on the performance and longevity of the flooring. So make sure you fix all its problems and have it in perfect condition.
- You can stagger the flooring seams in order to create a highly stable and visually presentable floor.
- Give your hardwood flooring enough time to acclimate to the humidity and temperature levels of the area to prevent deformations later on.
- The recommended levels of humidity and temperature are 30% to 50% and 55 degrees and 75 degrees respectively. Make sure you learn about any other considerations of your specific flooring type before the treatment.
- If you’re installing the new hardwood flooring atop an existing timber floor, then go for using secret nails for a seamless result.
- For maximum stability, make sure you nail your new wood planks at an angle of 90 degrees to the existing ones.
- Choose a wood species that can put up with all the foot traffic levels and equipment weight that your gym is going to receive. Take into account the occasional happenings of heavy stuff dropping as well, while you decide on a material.
- Make sure you get the finest quality adhesives, nails, or staples and sealants to make the flooring long-lasting and benefit from your investment.
- Invest in high-quality and resilient underlayments for maximum shock absorption, noise reduction, and protection of the subfloor. This is particularly crucial if you’re working in basements.
- Ensure sweeping and mopping the floors regularly to retain their beauty and keep damages at bay.
- The maintenance also includes refinishing at appropriate intervals, most commonly once every few years as the finish wears down over time.
- Keep checking the floors for problems and hazards like bumps, splinters, squeaking or loosened boards, stains, and/or cracks, and ensure prompt repairs to prevent the problem from spreading.
To Conclude!
If you have a thing for charming wooden floors and are thinking about adding them to your commercial or residential gym, our precise guide will have you covered regarding every single concern. All you need to do is bring about your timeless DIY spirit and you can easily be flaunting the beauty of the good old hardwood flooring in your place of business or personal fitness. We wish you the most convenient and fruitful flooring installation projects ahead and endless benefits for your investments and efforts!